This post contains affiliate links. If you purchase through these links, I may earn a small commission at no extra cost to you. I only recommend products I’ve personally researched and believe are worth your money.
The Game Boy Advance SP is one of the most beloved handhelds Nintendo ever produced — a clamshell design, built-in rechargeable battery, and a bright front-lit (AGS-001) or backlit (AGS-101) screen that was years ahead of anything else in 2003. But there’s one thing that genuinely drives collectors and daily players up the wall in 2026: that proprietary barrel charging port.
The original GBA SP charger is a squat, non-standard plug that almost nobody has lying around anymore. Cables break. Adapters get lost. You’re not plugging this thing into a USB-C power bank when you’re on a flight. It’s a problem — and the retro modding community solved it years ago with a simple solder swap: the GBA SP USB-C charging mod.
This guide covers everything you need to do the mod yourself, including which kit to buy, what tools you’ll need, and a full step-by-step installation walkthrough. It takes about 30–45 minutes and is one of the best quality-of-life upgrades you can make to any GBA SP.
Why Bother? The Case for USB-C on the GBA SP
Let’s address the obvious question first: is this mod worth it? Yes, unequivocally. Here’s why:
- Universal charging: USB-C means the same cable you use for your phone, your Switch, your laptop. One cable to rule them all.
- Power bank compatible: Charge your SP from any USB-C or USB-A power bank. No proprietary wall wart required.
- Future-proof: Original GBA SP chargers are aging and increasingly hard to find in good condition. USB-C will outlast any of us.
- Clean installation: The mod PCBs are designed to fit precisely in the original port cutout. From the outside, it looks factory.
The mod requires basic soldering skills — nothing exotic. If you’ve done a screen mod before, this is actually easier. If this is your first time soldering, the FunnyPlaying kit has only 6 solder points, making it a very manageable first project.
Which USB-C Mod Kit Should You Buy?
There are two main options available right now, both stocked at Hand Held Legend. They’re priced identically at $11.99, so the choice comes down to features.
Option 1: FunnyPlaying GBA SP USB-C Mod with Audio
The FunnyPlaying USB-C Mod with Audio ($11.99 at Hand Held Legend) is the recommended option for most people. It does two things in one swap:
- Replaces the proprietary charging port with a centered USB-C port
- Adds a USB-C audio-out — connect USB-C headphones or a USB-C to 3.5mm analog adapter to listen privately without the built-in speaker
It ships with a spacer included, which fills the gap around the USB-C port on the case for a clean finish. Six solder points. Compatible with both USB-C to USB-A and USB-C to USB-C cables (note: USB-C to USB-C only works on one cable orientation).
One caveat on the audio: you’ll need a passive (DAC-free) USB-C to 3.5mm adapter. Most cheap adapters with built-in DACs will not work correctly with the GBA SP’s analog audio signal. Passive adapters — including common Motorola and Google USB-C adapters — work fine.
Option 2: Robot_Retro GBA SP USB-C Charging Module

The Robot_Retro USB-C PCB ($11.99 at Hand Held Legend) is charge-only — no audio out — but it fully supports both USB-C to USB-C and USB-C to USB-A cables. It also has a 3D-printed spacer available separately if you want the perfectly flush fit. Notably, it’s also compatible with the original DS Phat, not just the GBA SP.
If you don’t care about audio out and already have good speakers or a speaker mod installed, this is a perfectly solid choice.
Tools and Parts You’ll Need
Before you start, gather everything. Nothing is worse than stopping mid-mod to hunt for a screwdriver.
- Tri-wing screwdriver (Y1.5 size): Required to open the GBA SP shell. Don’t try to improvise with a flathead; you’ll strip the screws.
- Phillips #00 screwdriver: For the internal motherboard screws.
- Soldering iron: A temperature-controlled iron set to around 320–350°C is ideal. A basic cheap iron will work but take your time.
- Flux: Helps the solder flow cleanly, especially for desoldering the old port.
- Solder wick or desoldering pump: To remove the original port’s solder.
- Isopropyl alcohol (90%+) and cotton swabs: For cleaning up flux residue after soldering.
- Plastic spudger or pry tool: Helps separate the shell halves without scratching.
- Tweezers: For handling the small PCB.
Total time: 30–45 minutes for an experienced modder; allow up to 90 minutes if this is your first solder mod.
Step-by-Step Installation Guide
Step 1 — Back Up Your Save Data (Optional But Wise)
If you’re playing games with save data on internal memory (not a flash cart), back up your saves before opening the unit. The mod itself doesn’t touch the battery or cartridge slot, but it’s good practice any time you open hardware. Flash cart users: saves live on the cart, you’re fine.
Step 2 — Open the Shell
Remove the battery from the GBA SP’s battery compartment. Then flip the unit over and remove the six tri-wing screws from the back casing (four on the outer corners, two near the hinge). Carefully separate the front and back shell halves using a plastic spudger — work around the seam slowly to avoid cracking the tabs.
Set the shell aside. You’ll now see the motherboard inside the front shell with the screen ribbon cable attached. You don’t need to disconnect the screen for this mod — just be careful not to tug on the ribbon cables.
Step 3 — Remove the Motherboard
Disconnect the battery flex cable and the ribbon cables connecting the motherboard to the screen. Take note of which way each cable is oriented. Remove the Phillips screws securing the motherboard to the front shell and lift it out carefully.
Step 4 — Desolder the Original Charging Port
This is the only genuinely tricky step. The original GBA SP charging port has two signal pins plus two large mechanical tabs that anchor it to the PCB. The mechanical tabs are the challenge — they’re usually filled with a lot of solder.
Apply flux to all solder points first. Use solder wick or a pump to remove as much solder as possible from each point. Apply gentle lifting pressure to the port while heating each pin — once all pins are free simultaneously, the port will lift off. Don’t force it. You risk lifting a pad if any pin is still soldered.
Clean the area thoroughly with IPA and a cotton swab.
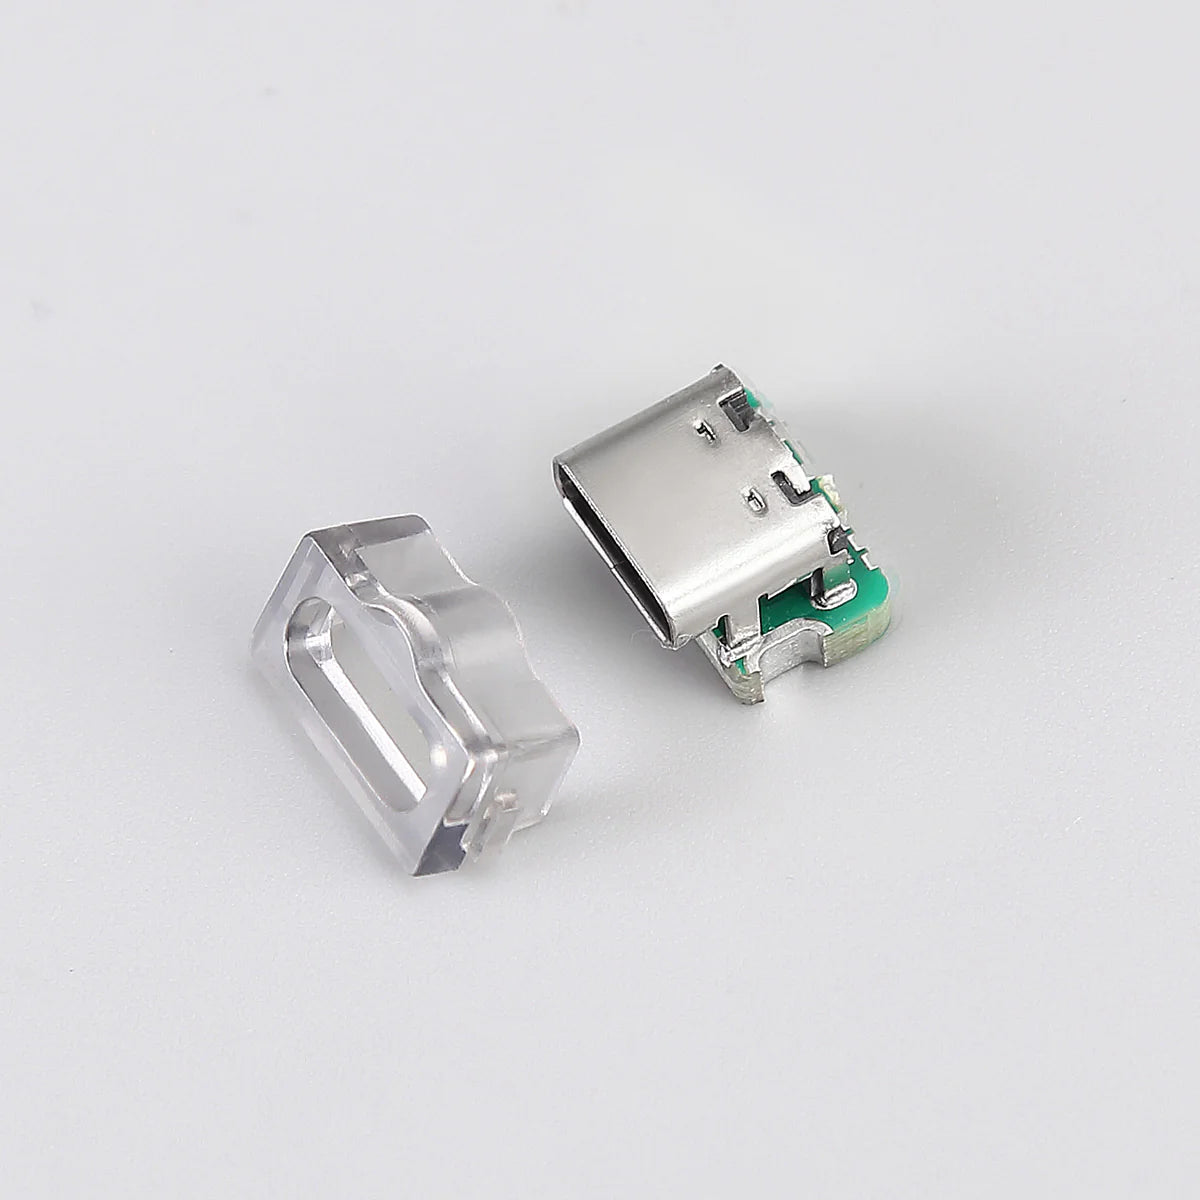
Step 5 — Install the USB-C PCB
Test-fit the new USB-C PCB in the port cutout on the motherboard. Orient it so the USB-C port faces outward (toward the bottom of the GBA SP when reassembled). The PCB should sit flush on the solder pads.
For the FunnyPlaying mod: solder all six points — the four corner/signal pads plus two structural anchor points. Apply a small amount of flux, then touch your iron and solder to each pad for 2–3 seconds. Don’t apply heat for longer than necessary.
After soldering, apply the bezel/spacer if included. Important: on the FunnyPlaying mod, install the bezel after soldering — not before. Soldering with the bezel already attached can melt the plastic.
Step 6 — Clean Up and Test Before Reassembly
Use IPA and a cotton swab to clean any flux residue from around the new port. Visually inspect your solder joints — they should be smooth and shiny, not blobby or bridging adjacent pads.
Before reassembling the full shell, do a quick test: reinsert the battery (just rest it in place), reconnect the screen cables, and plug in a USB-C cable. The GBA SP’s orange charge indicator LED should light up. If it does, you’ve nailed it.
Step 7 — Reassemble
Reconnect all ribbon cables and the battery flex. Seat the motherboard back in the front shell and replace the Phillips screws. Carefully align the back shell half and press it together — the tabs should click into place. Replace the six tri-wing screws (snug, not overtightened — these are plastic threaded bosses and will strip if you go hard).
Reinsert the battery, plug in your USB-C cable, and you’re done.
Troubleshooting Common Issues
Charge LED doesn’t light up after install: Check all solder joints for cold joints or bridges. Use a multimeter to test continuity across the charging pads. Most failures come from an insufficiently heated mechanical anchor tab or a cold joint on a signal pin.
USB-C to USB-C cable not working (FunnyPlaying only): This is normal — the FunnyPlaying mod only supports USB-C to USB-C in one cable orientation. Try flipping the cable at the power brick end. If it works with USB-C to USB-A, the install is correct.
Audio out not working (FunnyPlaying only): Ensure you’re using a passive analog adapter. USB-C to 3.5mm adapters with built-in DACs will not produce sound. The Motorola SHO3 and Google Pixel USB-C adapters are both passive and confirmed working.
Shell won’t close cleanly: Check that the bezel/spacer is seated properly and not catching on the shell edge. A small amount of gentle pressure to snap the bezel fully into the port cutout usually resolves this.
While You Have the GBA SP Open
Since you’re in there anyway, this is the perfect time to consider a few companion mods:
- IPS screen upgrade: If you have an AGS-001 (front-lit, not backlit), upgrading to a 3.0″ laminated IPS panel is a huge visual improvement. Our GBA IPS Screen Mod Guide covers the process step by step.
- Shell replacement: Fresh shells are widely available and give a worn SP a new lease on life. IPS-modified shells (with the slightly wider screen window) are worth considering if you’re doing a screen upgrade at the same time.
- Battery upgrade: The stock SP battery degrades over two decades. Replacement cells are available from FunnyPlaying and other suppliers.
The Verdict
The GBA SP USB-C charging mod is, pound for pound, one of the best quality-of-life modifications in the retro handheld scene. It’s cheap, reversible if you’re careful, visually invisible from the outside, and makes the GBA SP genuinely practical to use as a daily carry in 2026. At $11.99 for the FunnyPlaying kit with audio included, there’s almost no reason not to do it if you’re at all comfortable with a soldering iron.
If this is your first time doing any GBA SP work, start here. It’ll build confidence for bigger mods down the road, and you’ll immediately notice the difference every time you go to charge the thing.
Leave a Reply